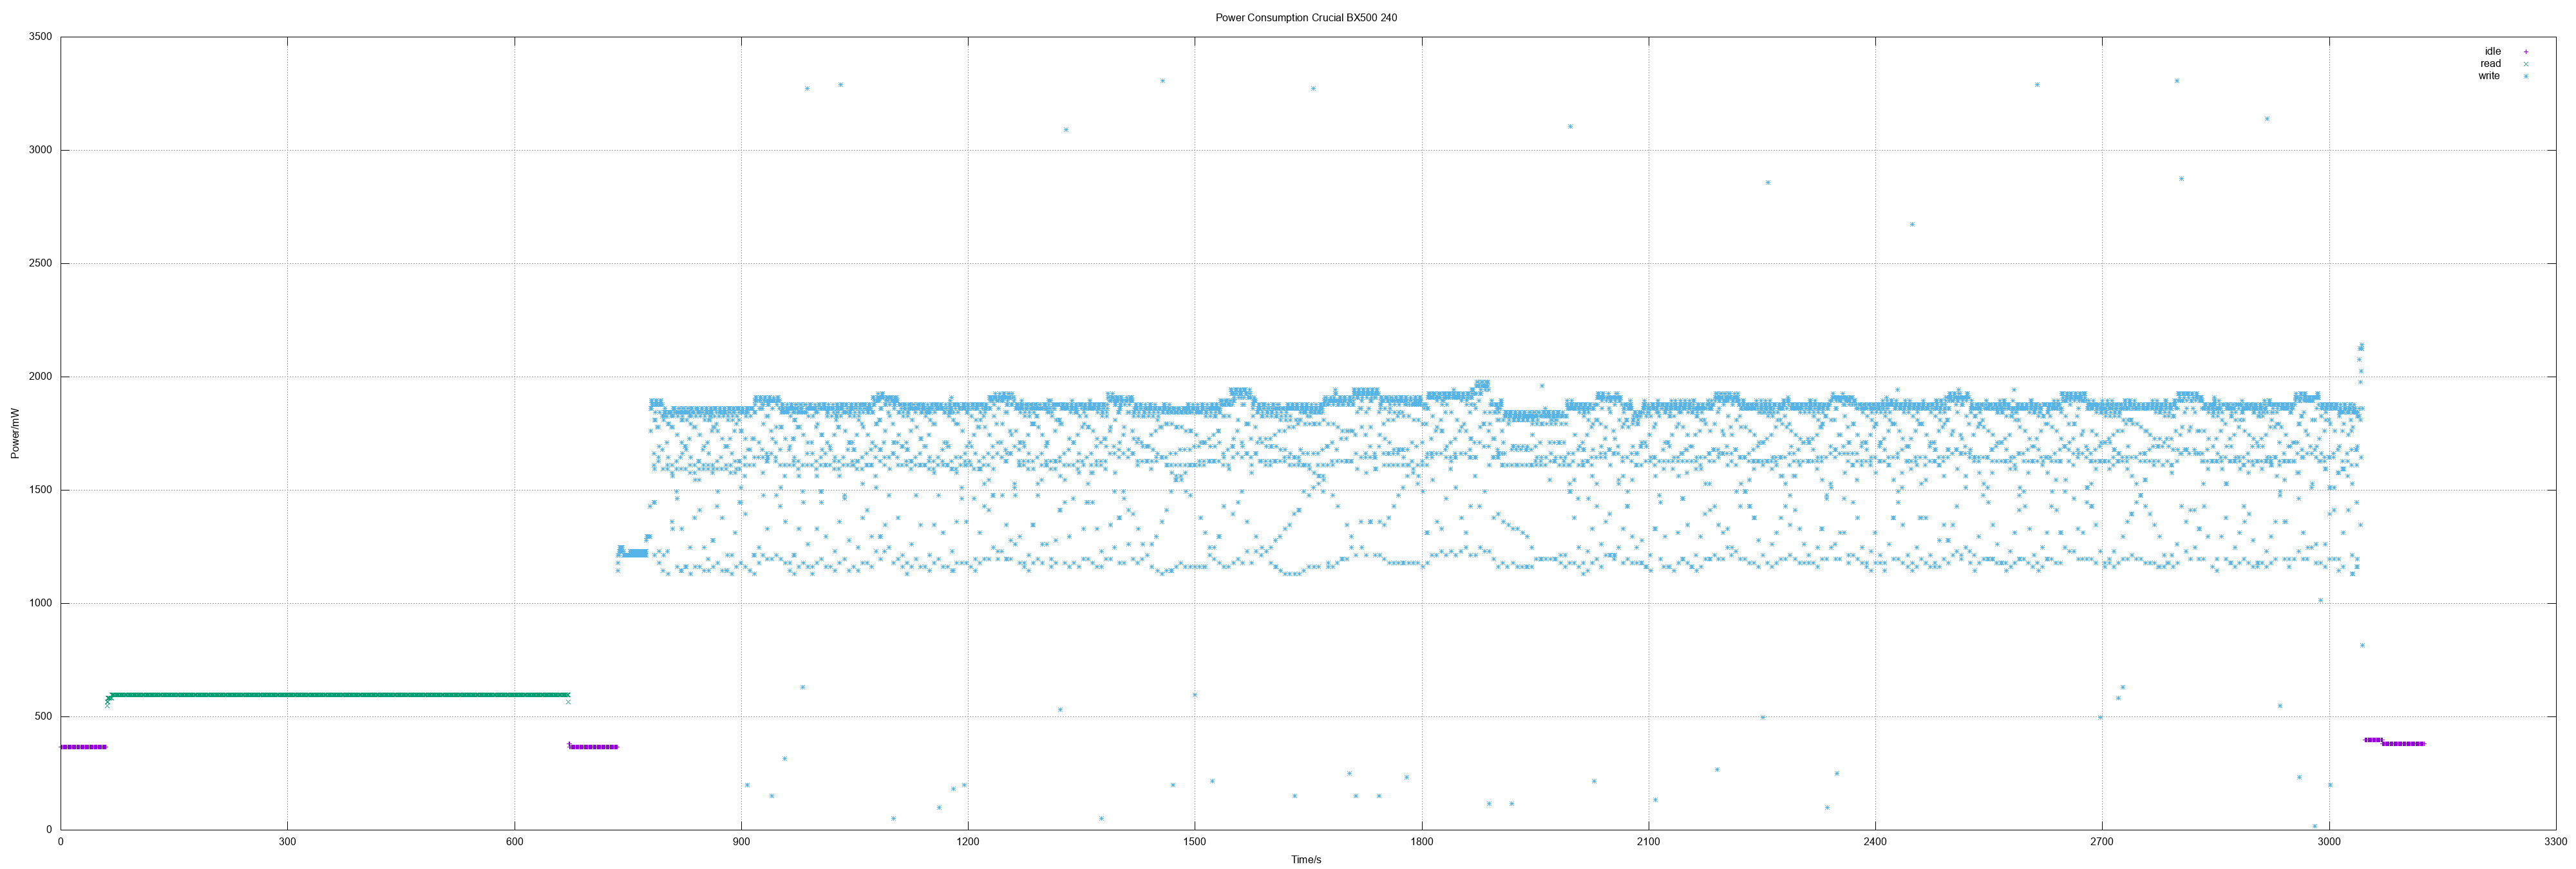
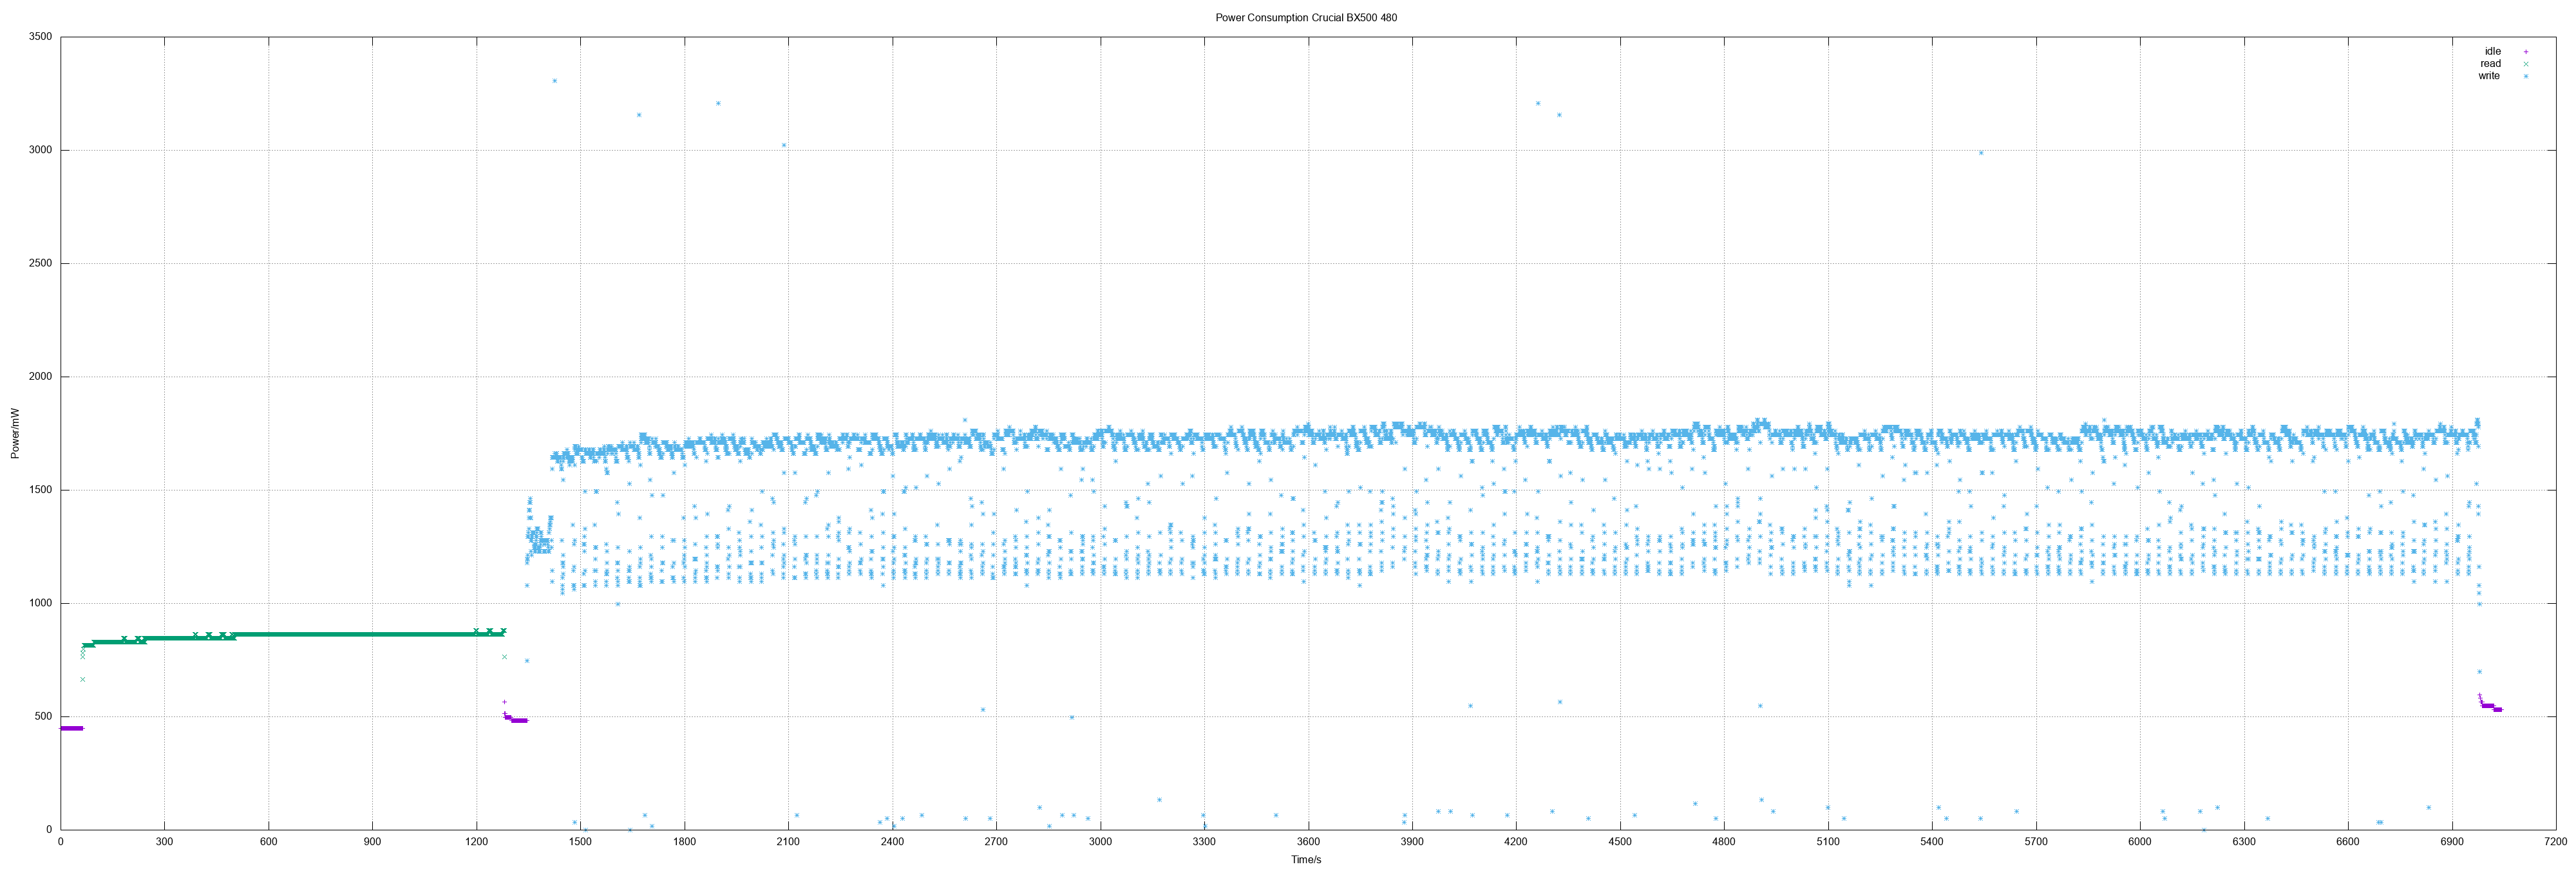
I was curious if the widely used Crucial BX 500 did also "fail" as 480 GB model. And actually it shows the same picture as the 240 GB model: Fine consumption on standby, read values "ok" but high on write - with the same high bandwidth from approx. 1 Watts to 3.3 Watts.
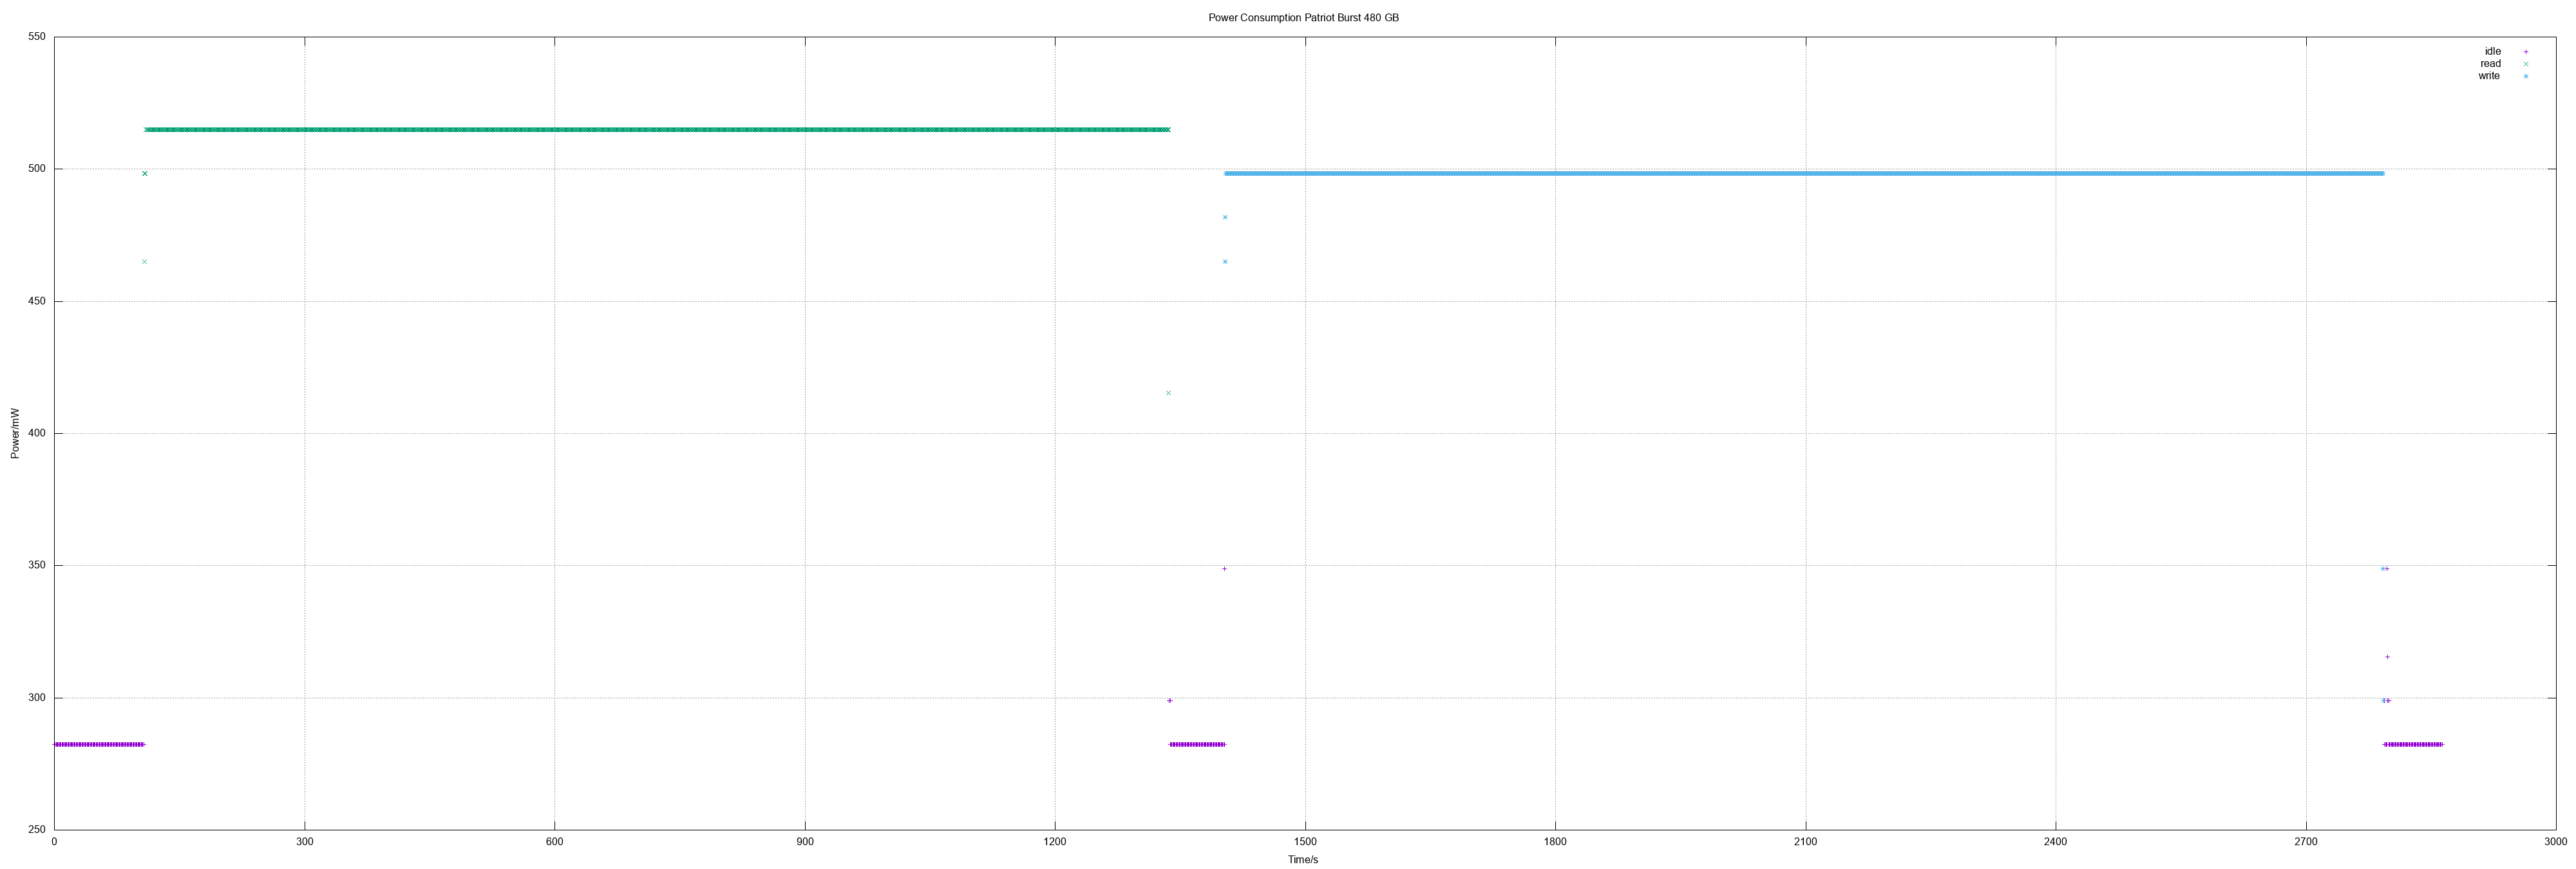
Another two Patriot Burst 240 did also show the same results as the first Patriot Burst 240 measurement.
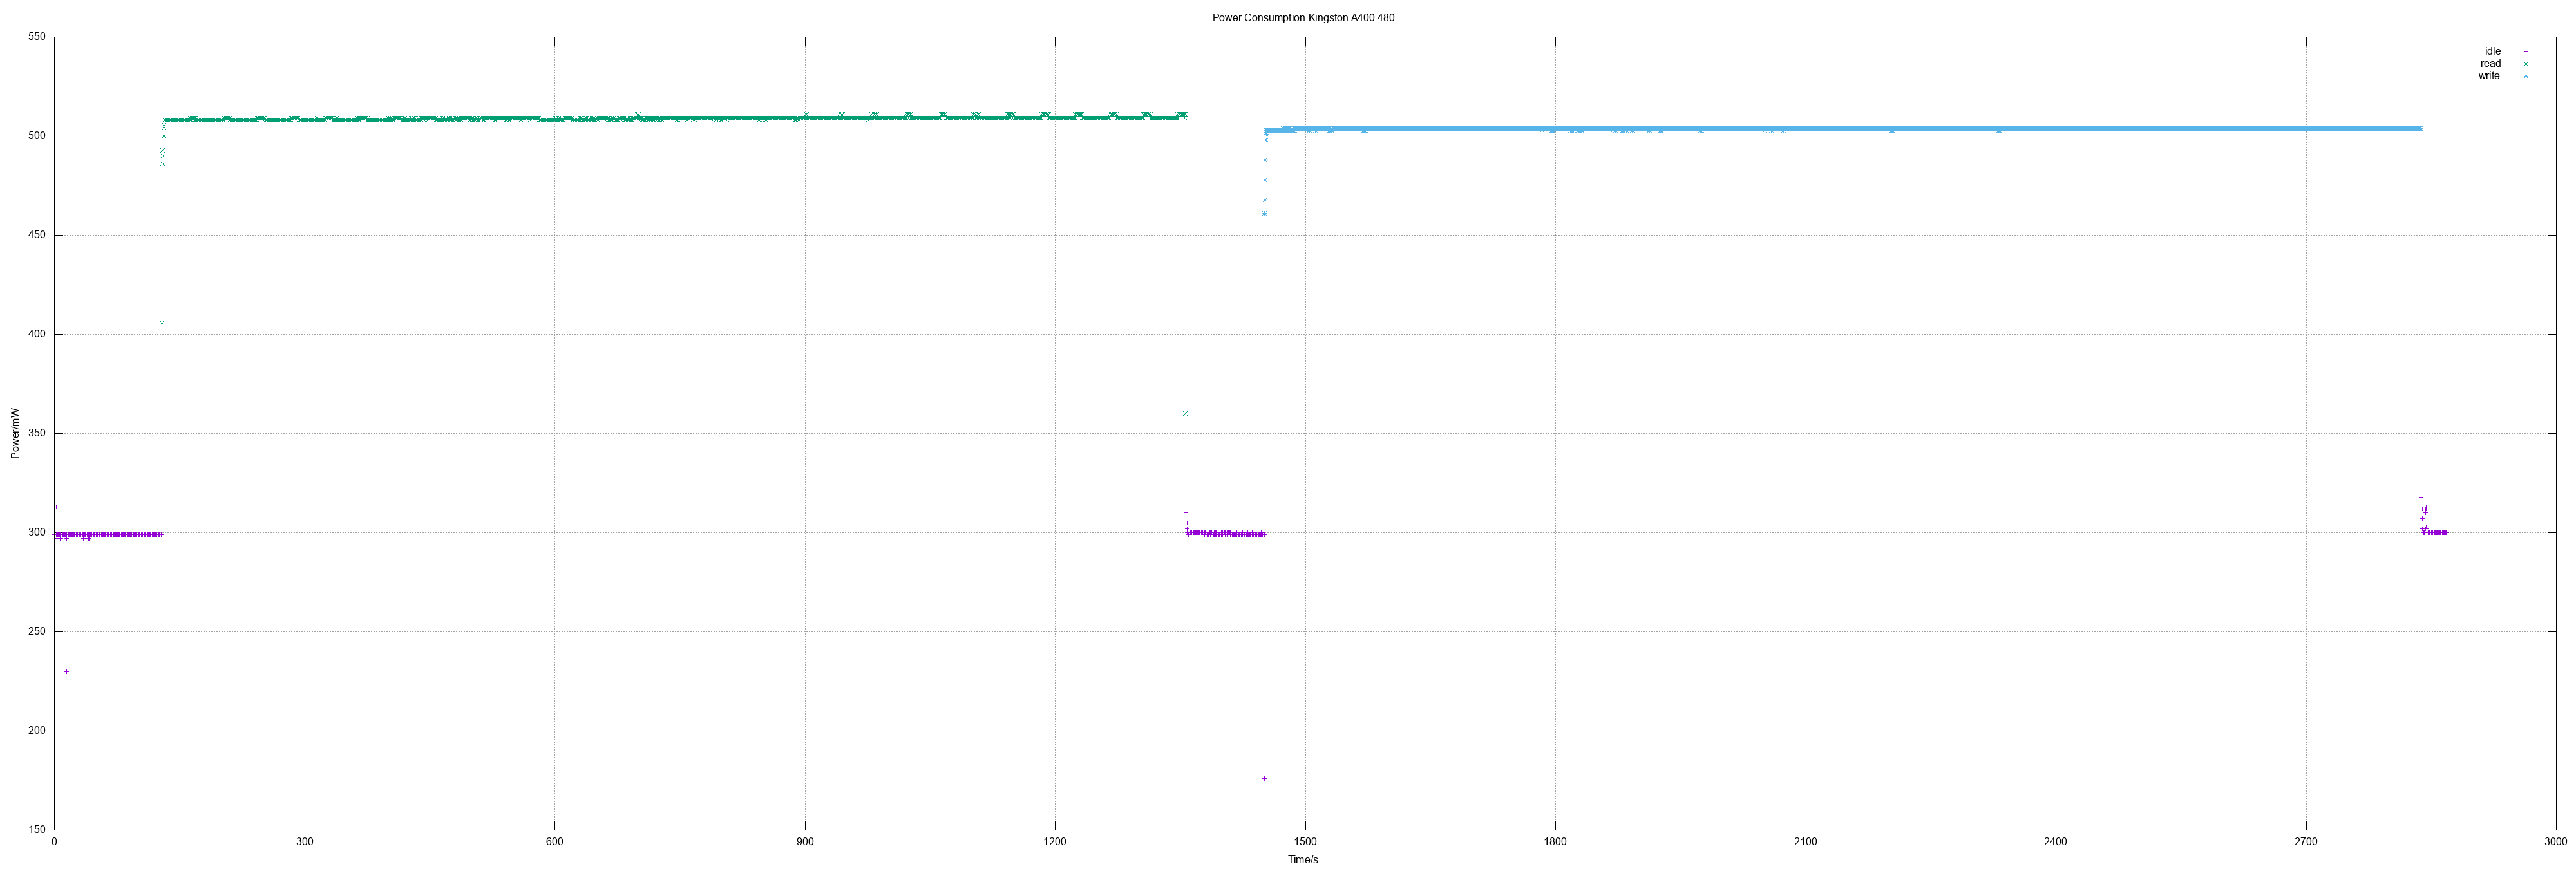
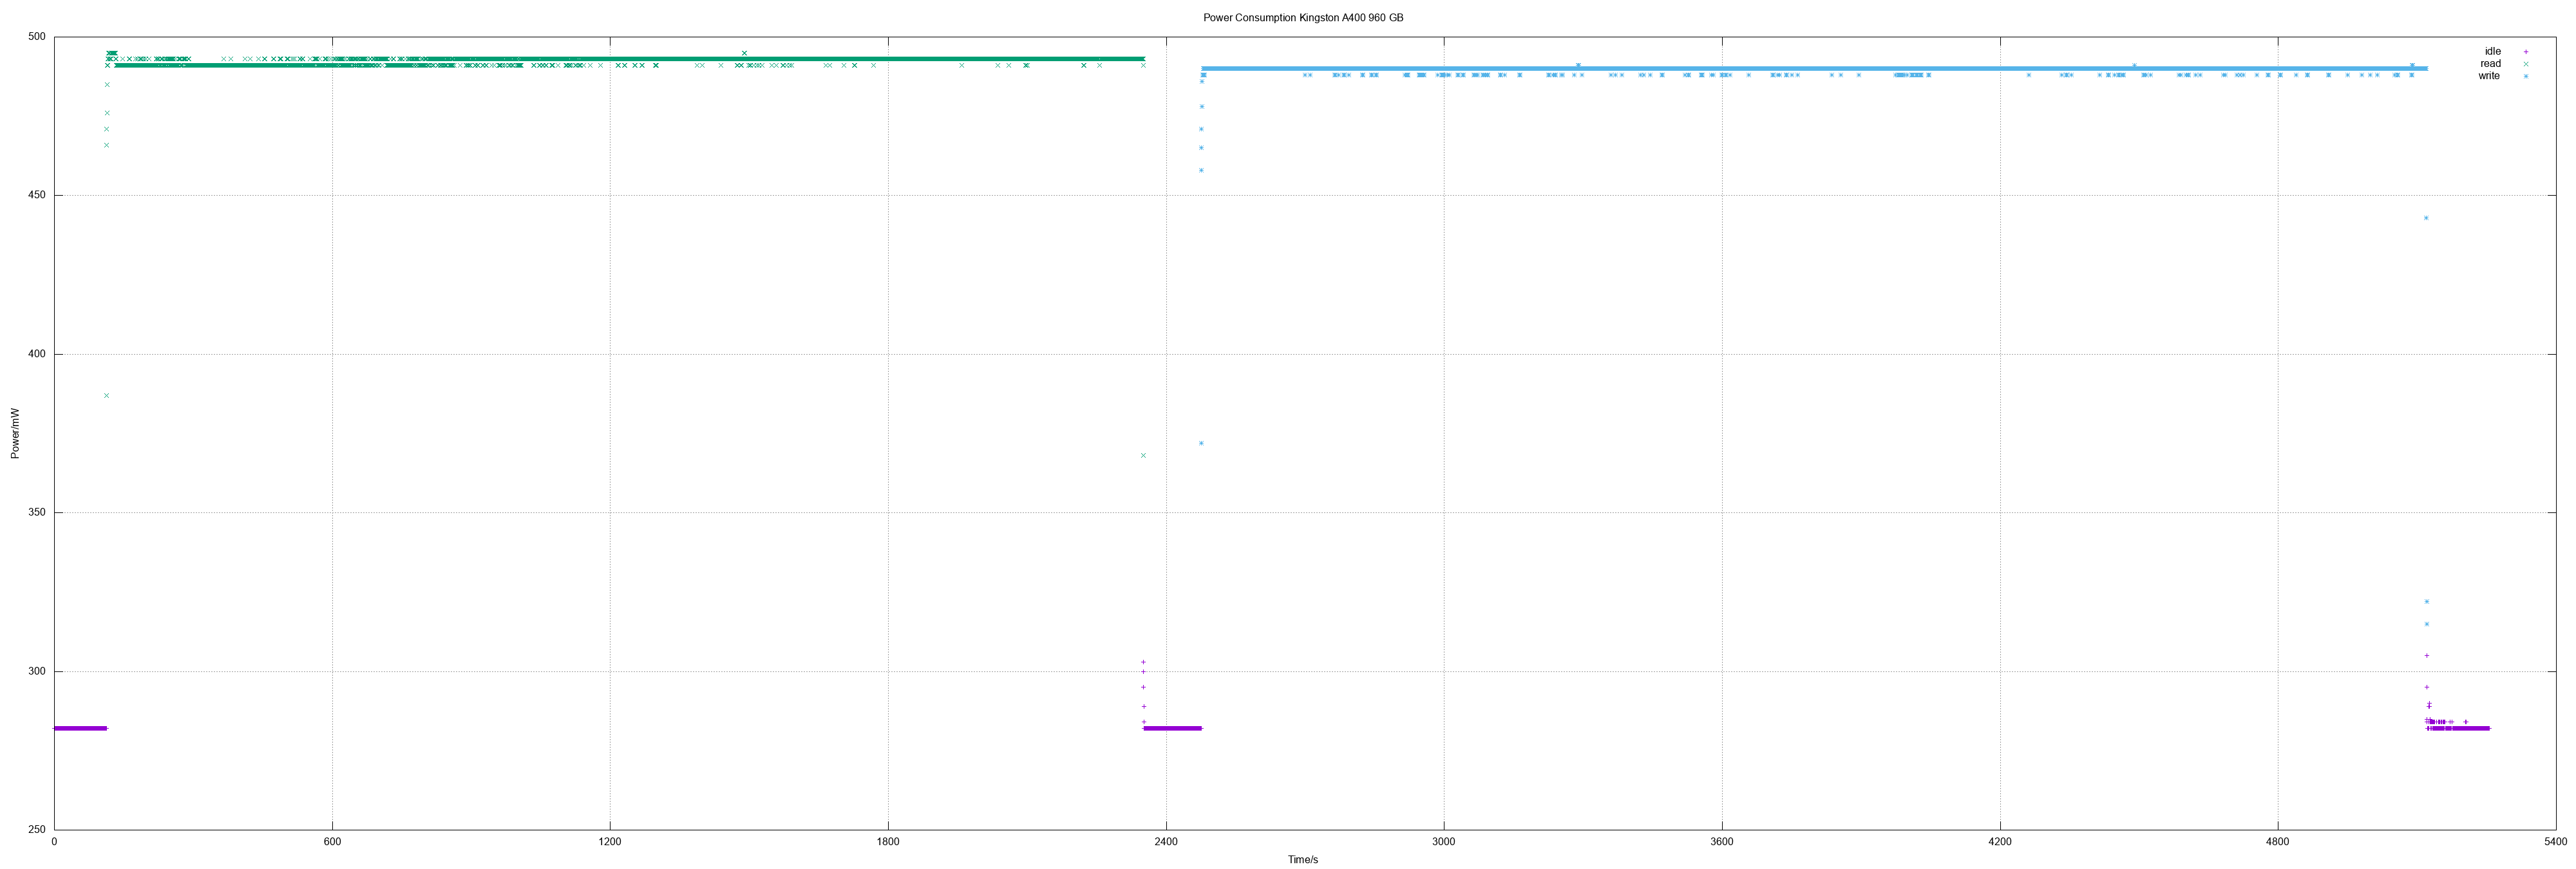
And the Kingston A400 960 was the first "1 TB class" SSD I measured. It did show the same great values like the 480 model did.
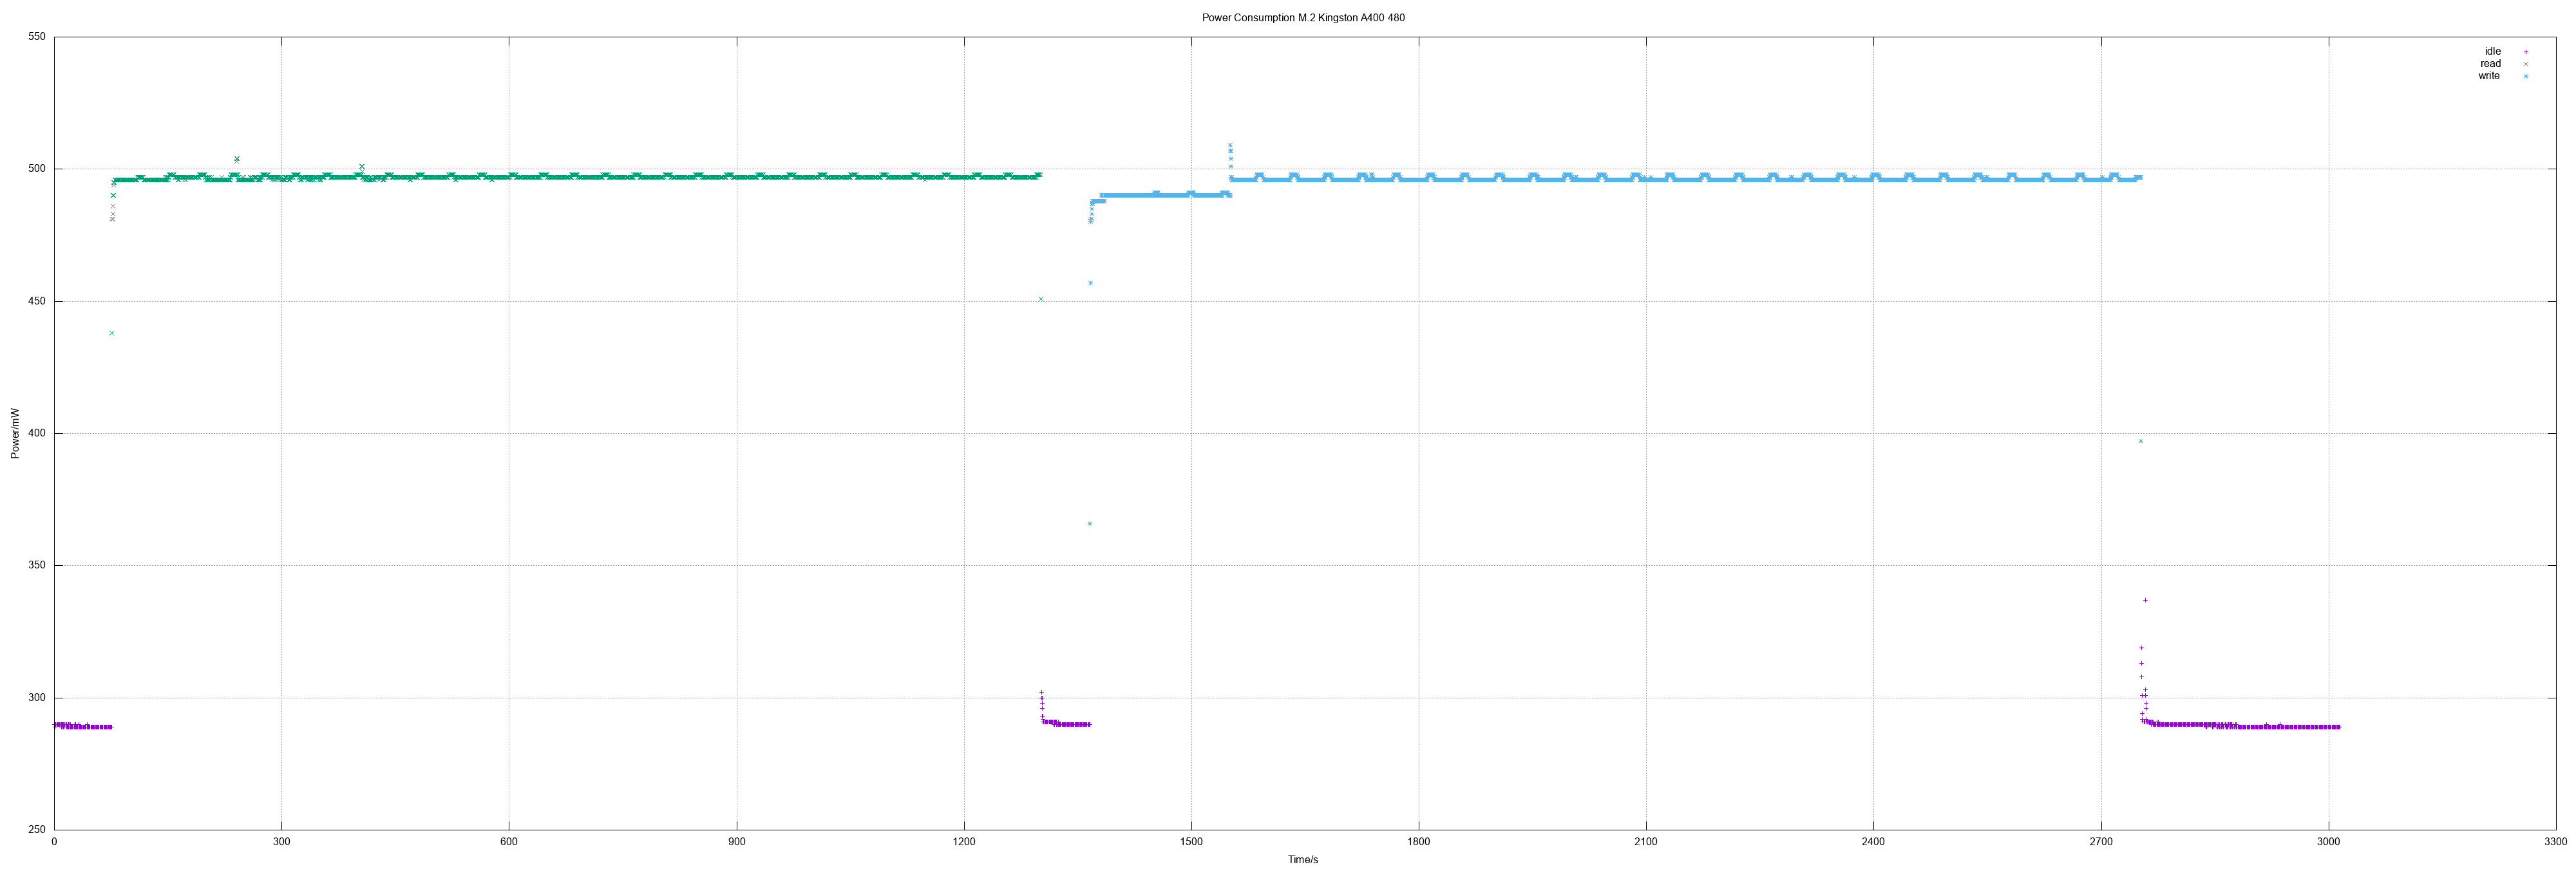
In addition to even more SSDs I made also the first measurement of an M.2 SSD (SATA, of course). Values were the same as for 2.5" SSD.
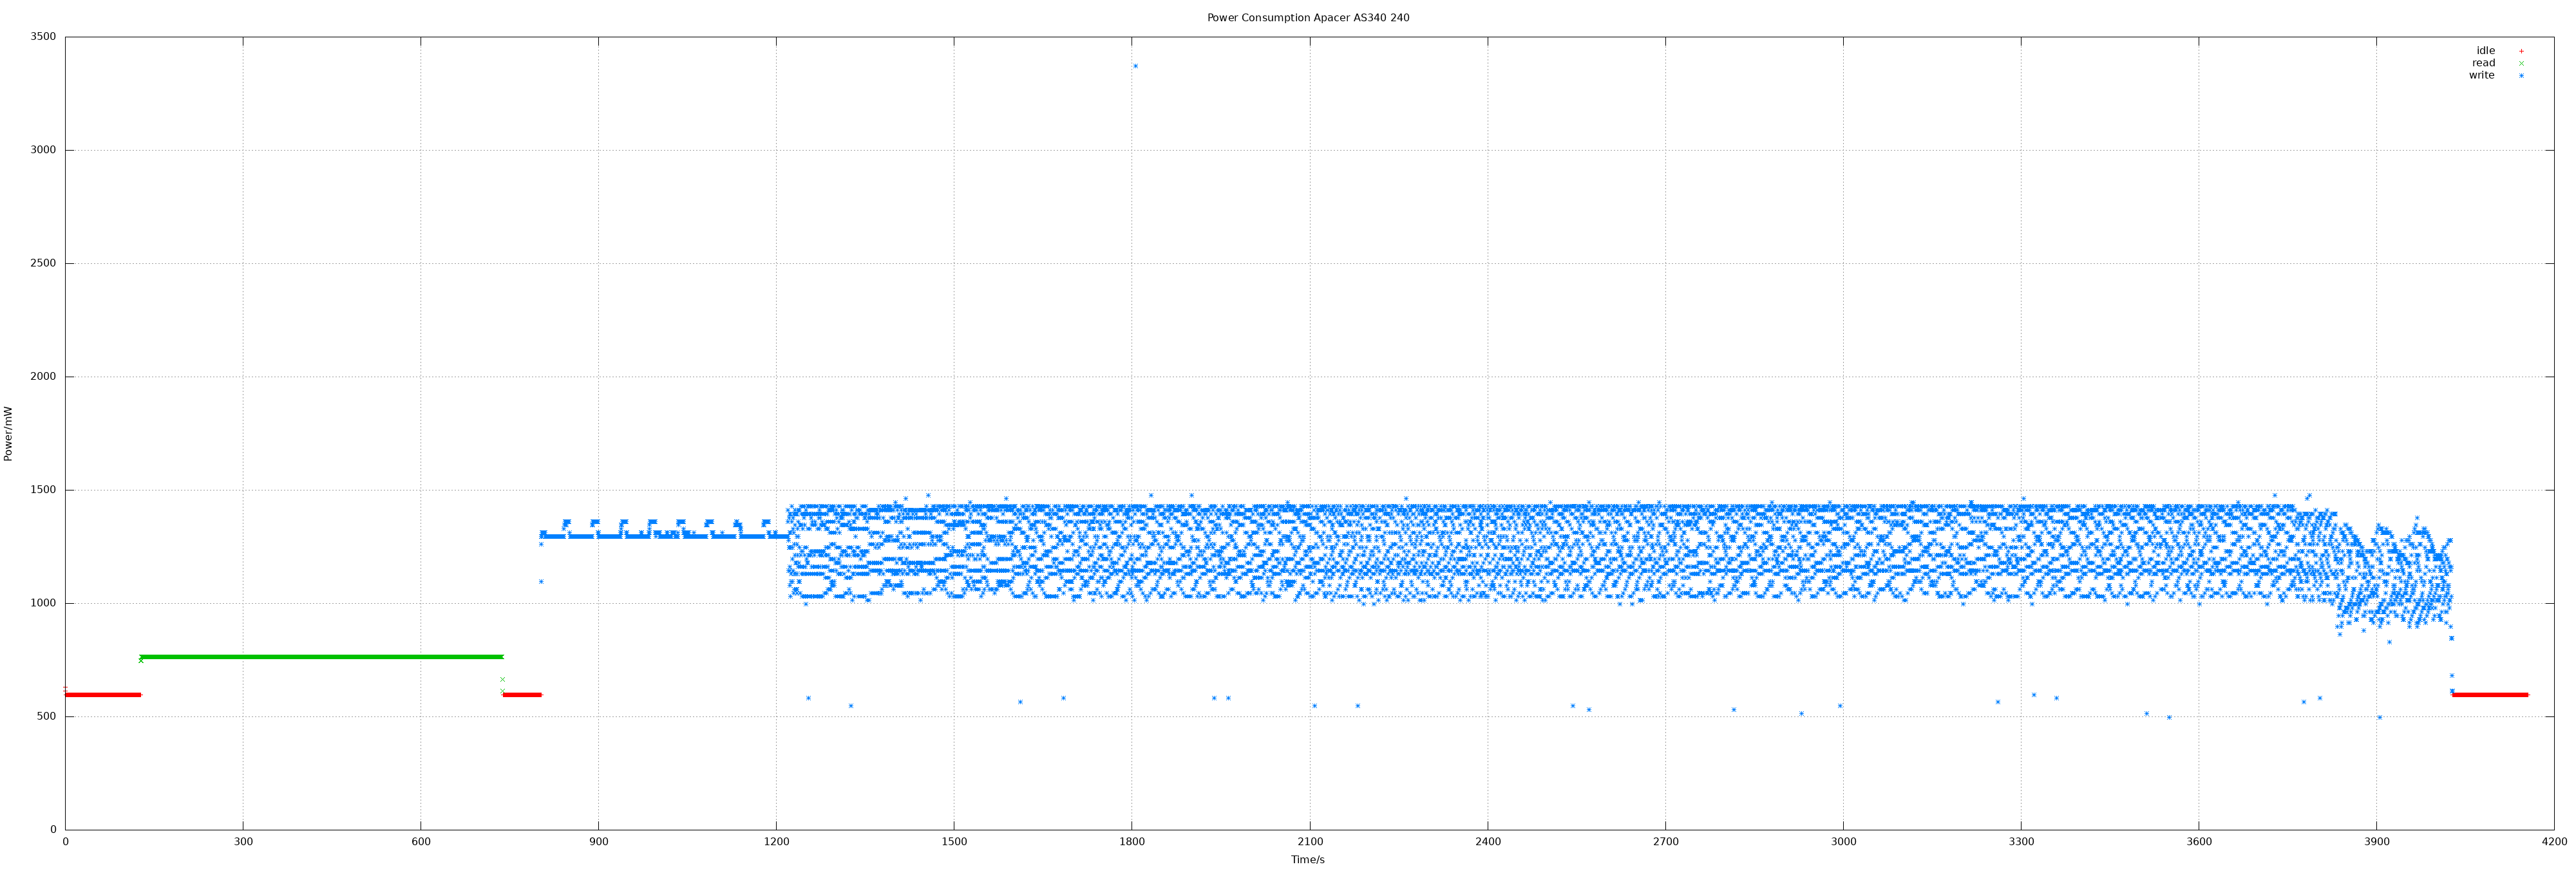
Apacer AS340 240 GB
240 GB means actually 468862128 sectors.
- Idle 0.6 W
- Read 0.76 W
- Write 1.25 W, max 3.3 W
- Read all sectors: 10m15.074s (372 MiB/s)
- Write all sectors: 50m43.854s (75 MiB/s)
Crucial BX500 480
480 GB means actually 937703088 sectors.
- Idle 0.49 W
- Read 0.86 W
- Write 1.66 W
- Read all sectors: 20m25.698s (373 MiB/s)
- Write all sectors: 94m0.830s (81 MiB/s)
Kingston A400 960
960 GB means actually 1875385008 sectors.
- Idle 0.28 W
- Read 0.49 W
- Write 0.49 W
- Read all sectors: 37m22.774s (408 MiB/s)
- Write all sectors: 44m10.833s (345 MiB/s)
M.2 Kingston A400 480
480 GB means actually 937703088 sectors.
- Idle 0.3 W
- Read 0.5 W
- Write 0.5 W
- Read all sectors: 20m29.645s (372 MiB/s)
- Write all sectors: 23m11.808s (329 MiB/s)
Values overview
| SATA SSD | r pow (W) |
w pow (W) |
r spd (MB/s) |
w spd (MB/s) |
|---|---|---|---|---|
| ADATA SU800 256 | 1.4 | 2.2 | ||
| Apacer AS340 240 | 0.76 | 1.25 | 372 | 75 |
| Corsair Force LE 120 | 0.58 | 0.58 | ||
| Crucial BX500 240 | 0.6 | 1.7 | 372 | 99 |
| Crucial BX500 480 | 0.86 | 1.66 | 373 | 81 |
| Kingston A400 240 | 0.52 | 1.08 | 371 | 290 |
| Kingston A400 480 | 0.5 | 0.5 | 371 | 328 |
| 0.49 | 0.49 | 408 | 345 | |
| Patriot Burst 120 | 0.54 | 0.54 | 371 | 86 |
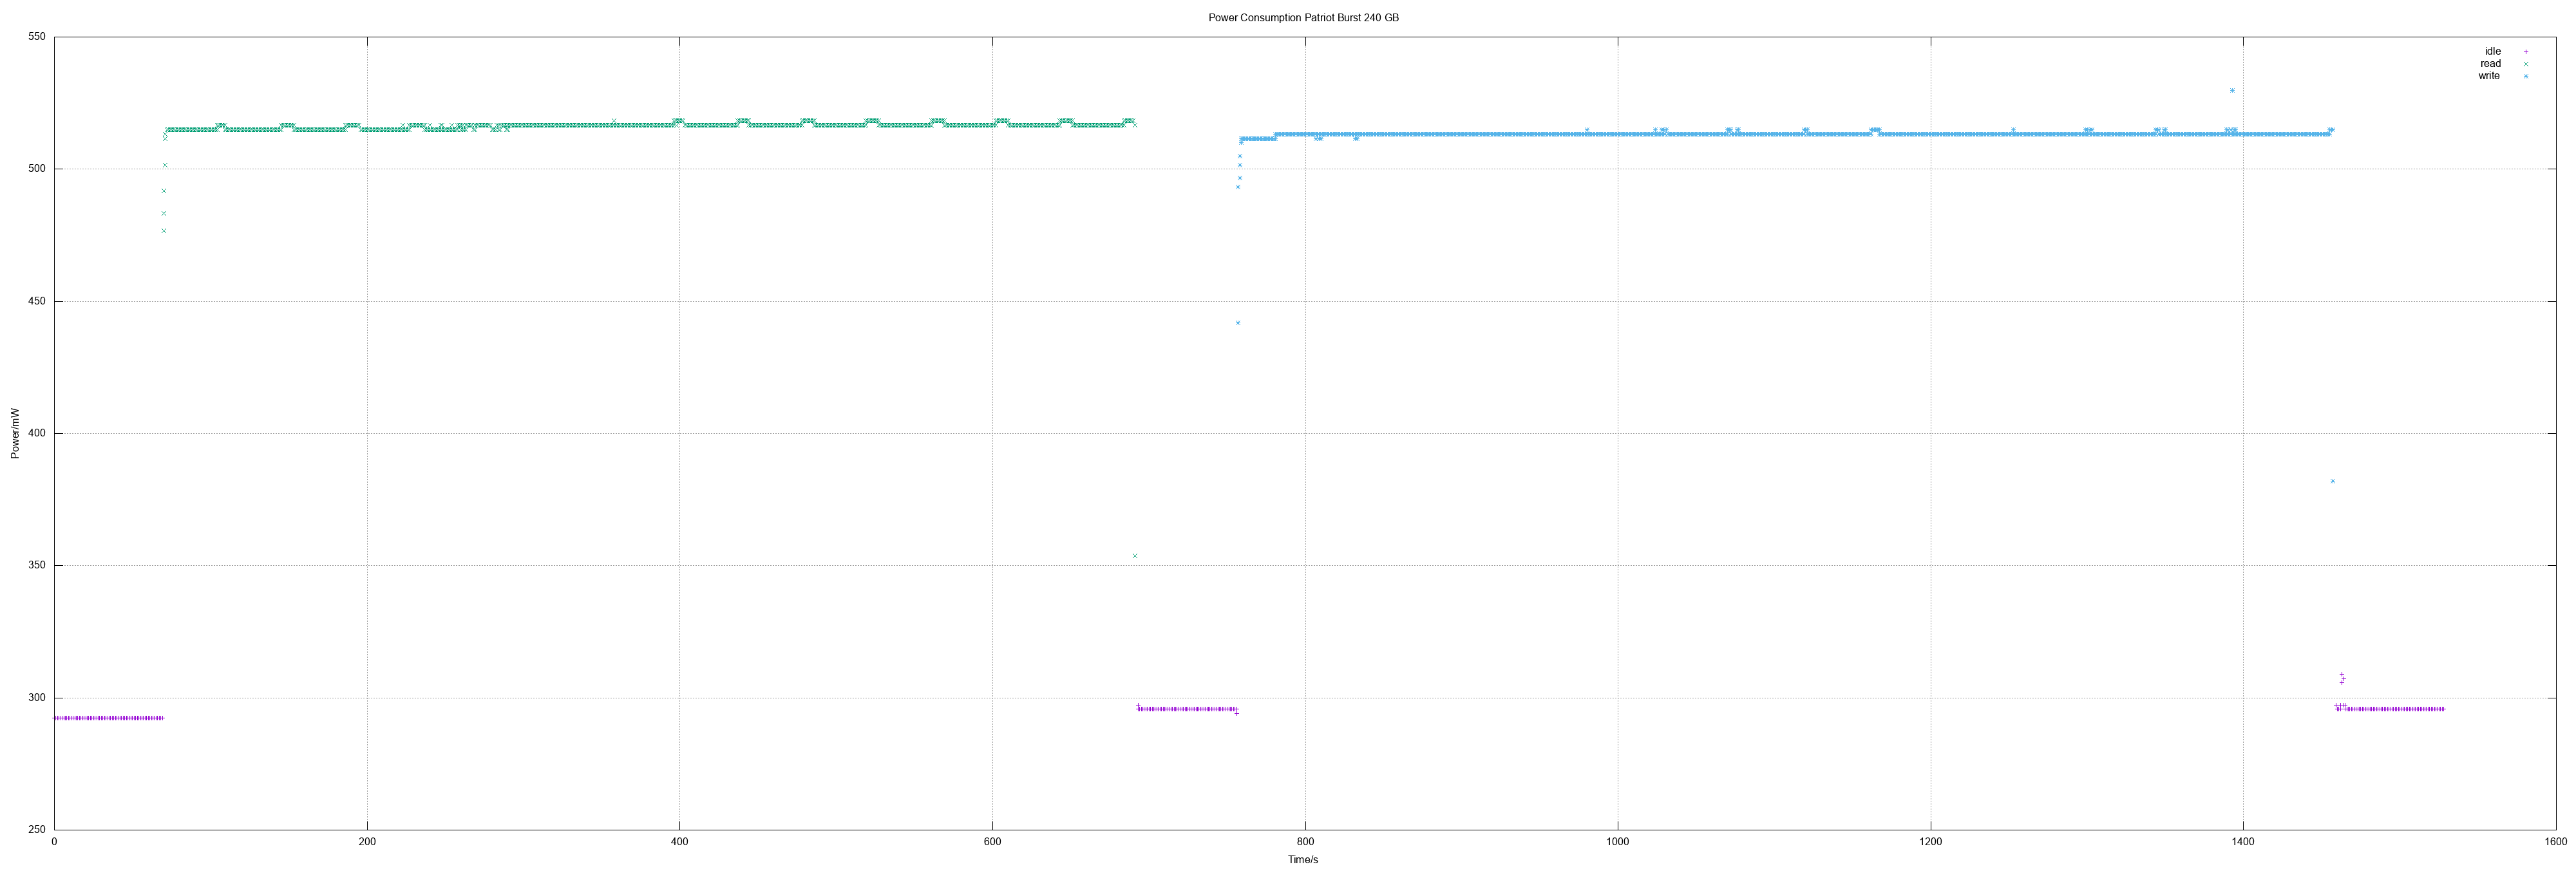
| Patriot Burst 240 | 0.52 | 0.52 | 369 | 327 |
| Patriot Burst 480 | 0.51 | 0.5 | 371 | 328 |
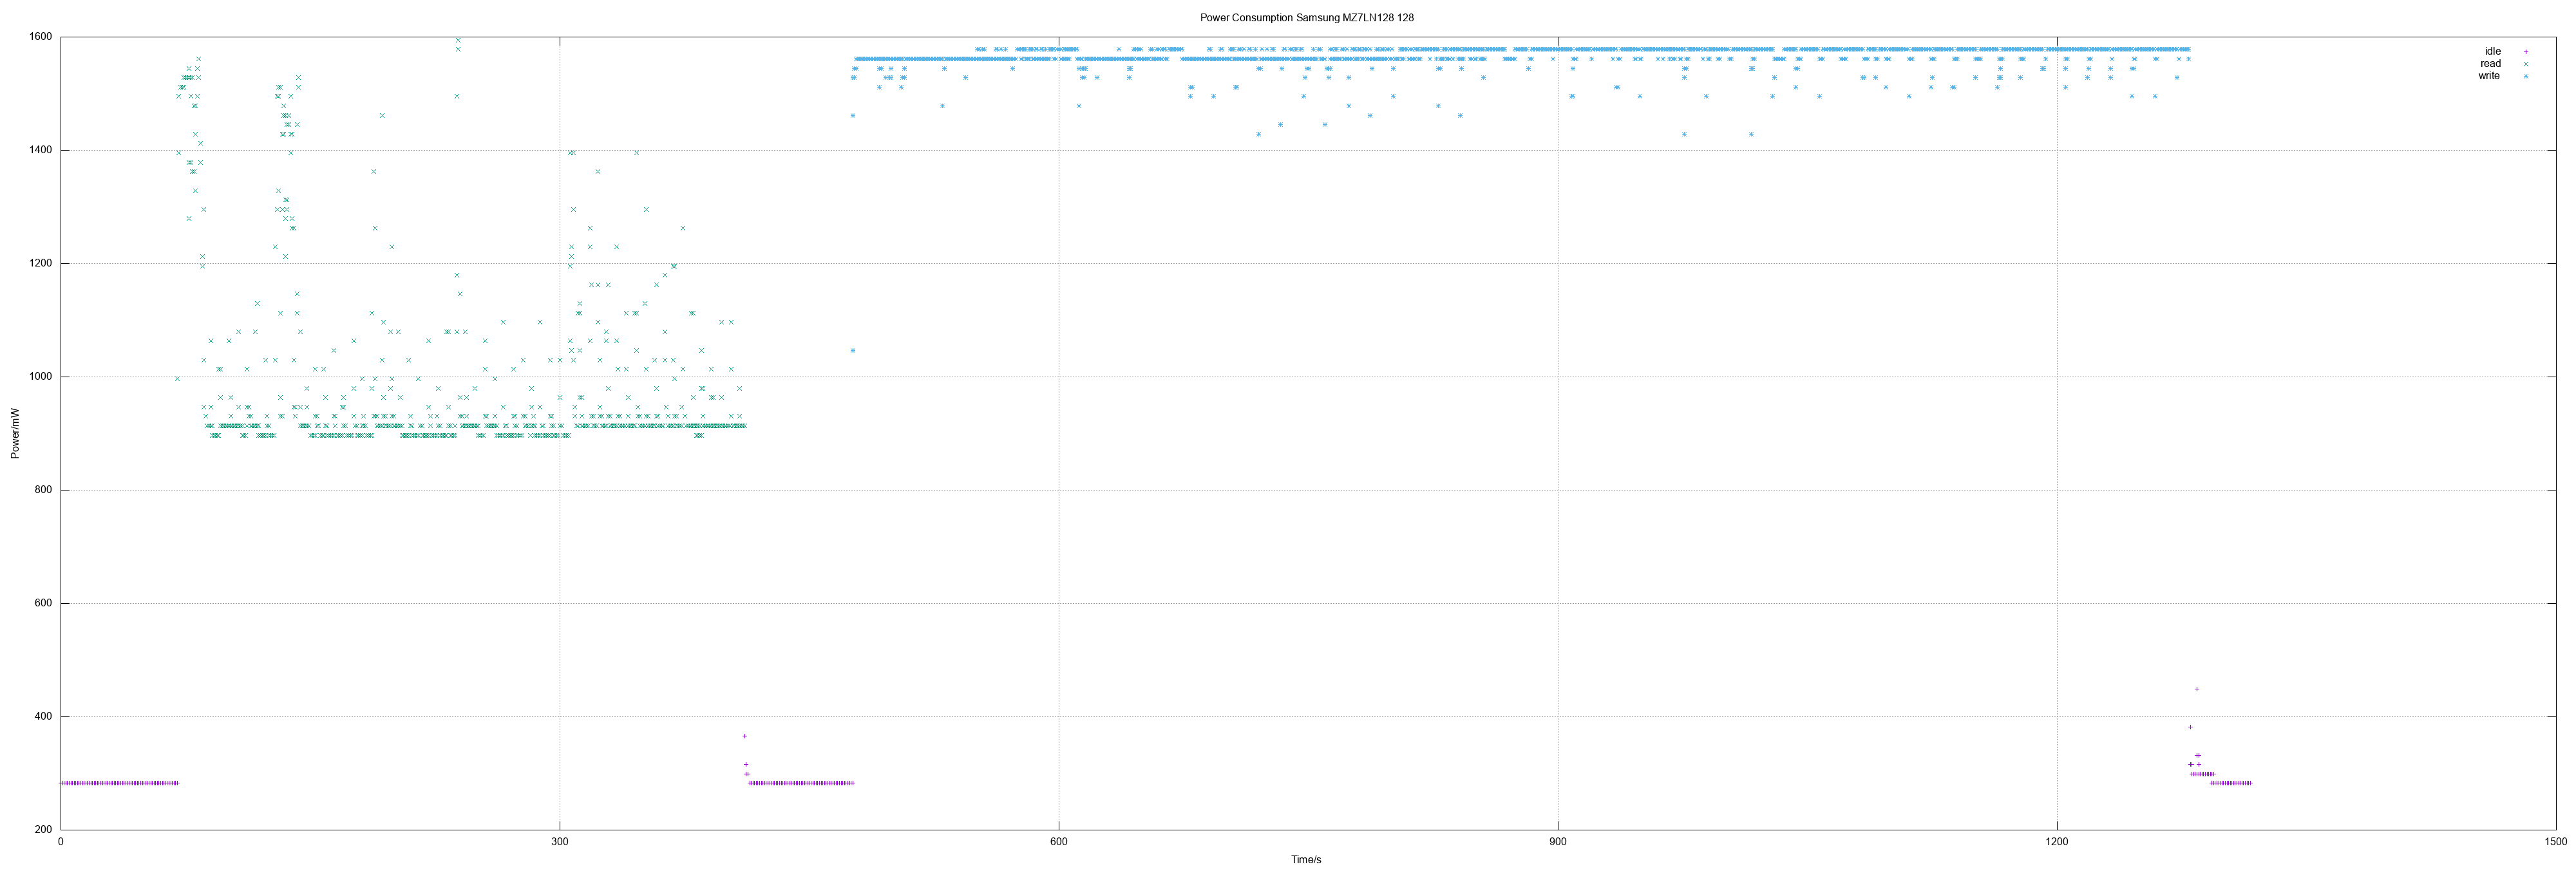
| Samsung MZ7LN128 | 0.97 | 1.57 | 353 | 150 |
| Sandisk Z410 120 | 0.7 | 1.5 | ||
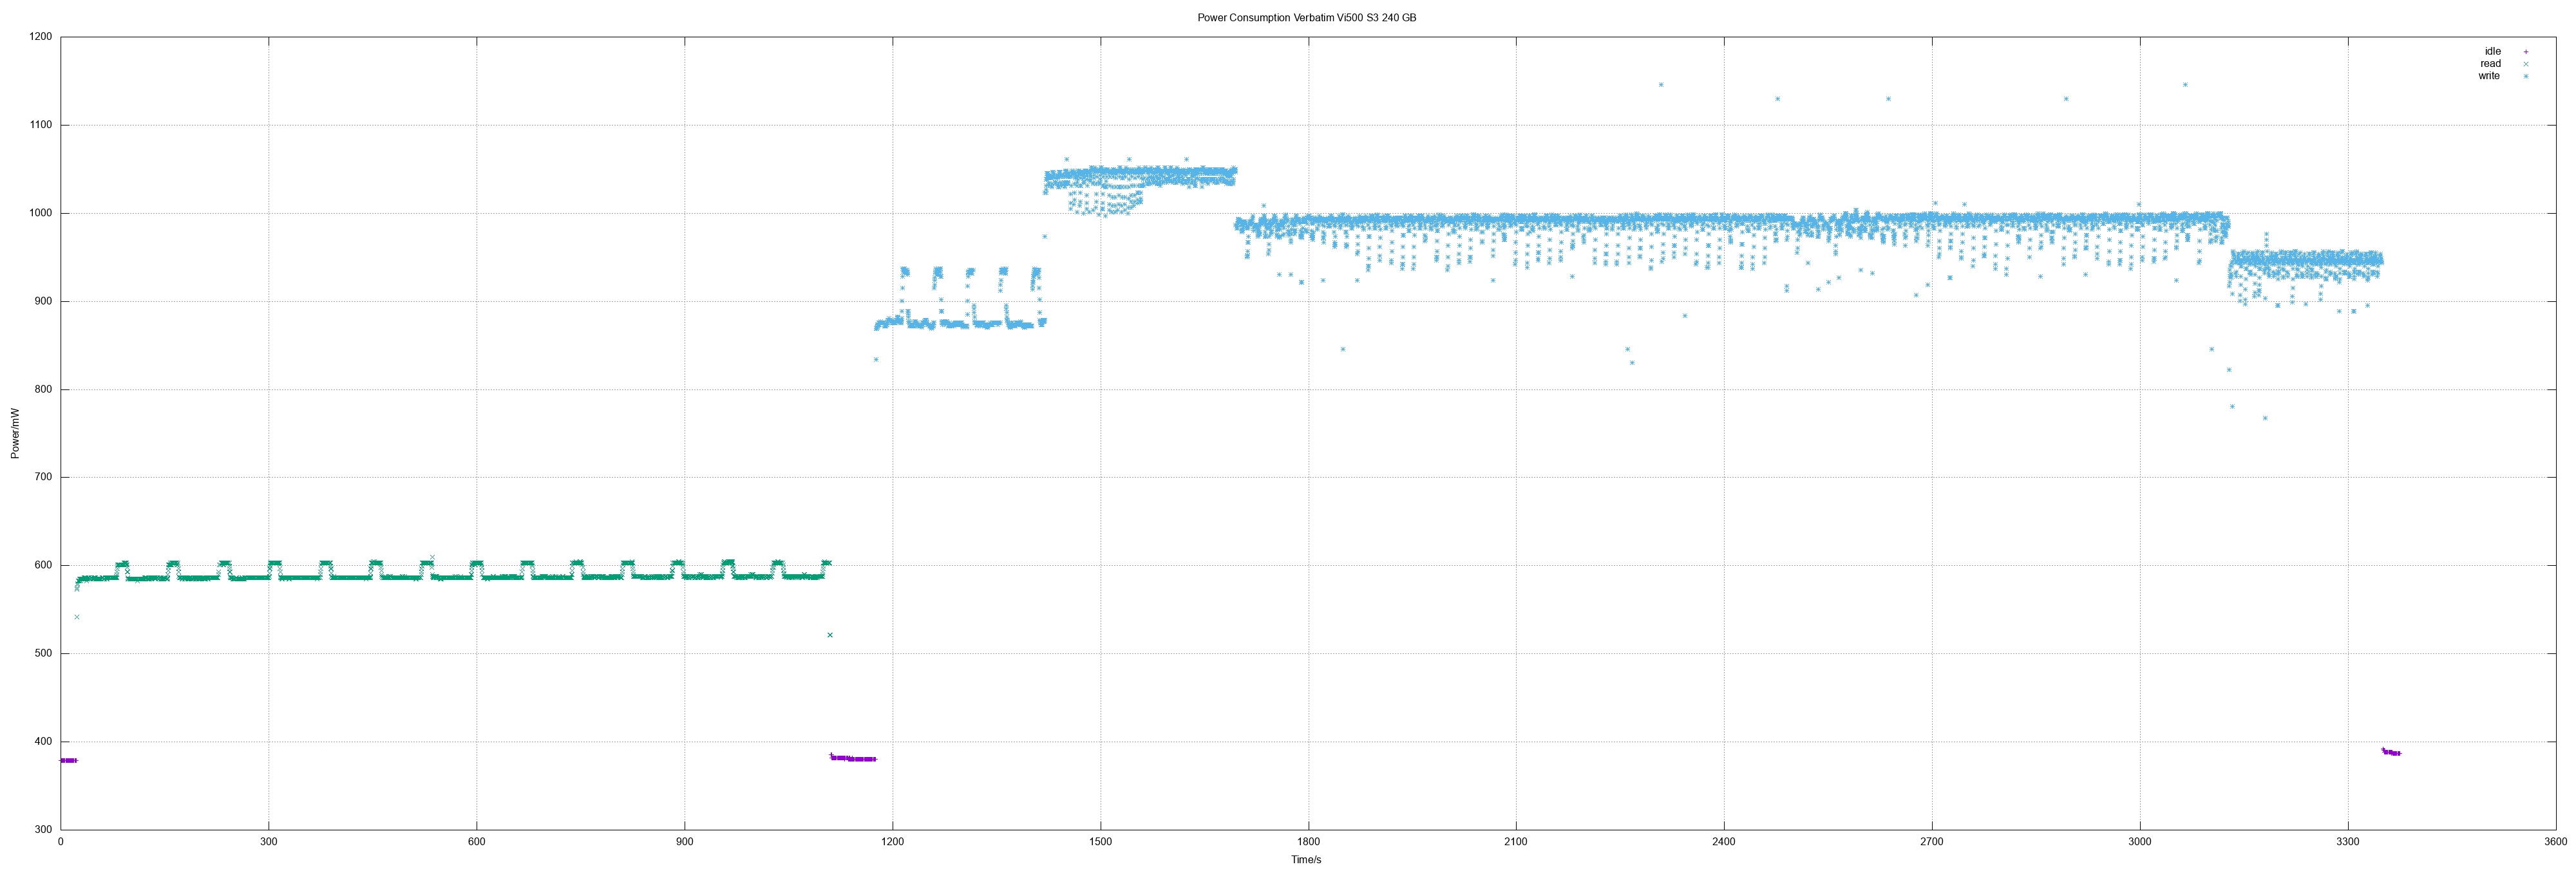
| Verbatim Vi500 S3 240 | 0.59 | 0.98 | 211 | 117 |
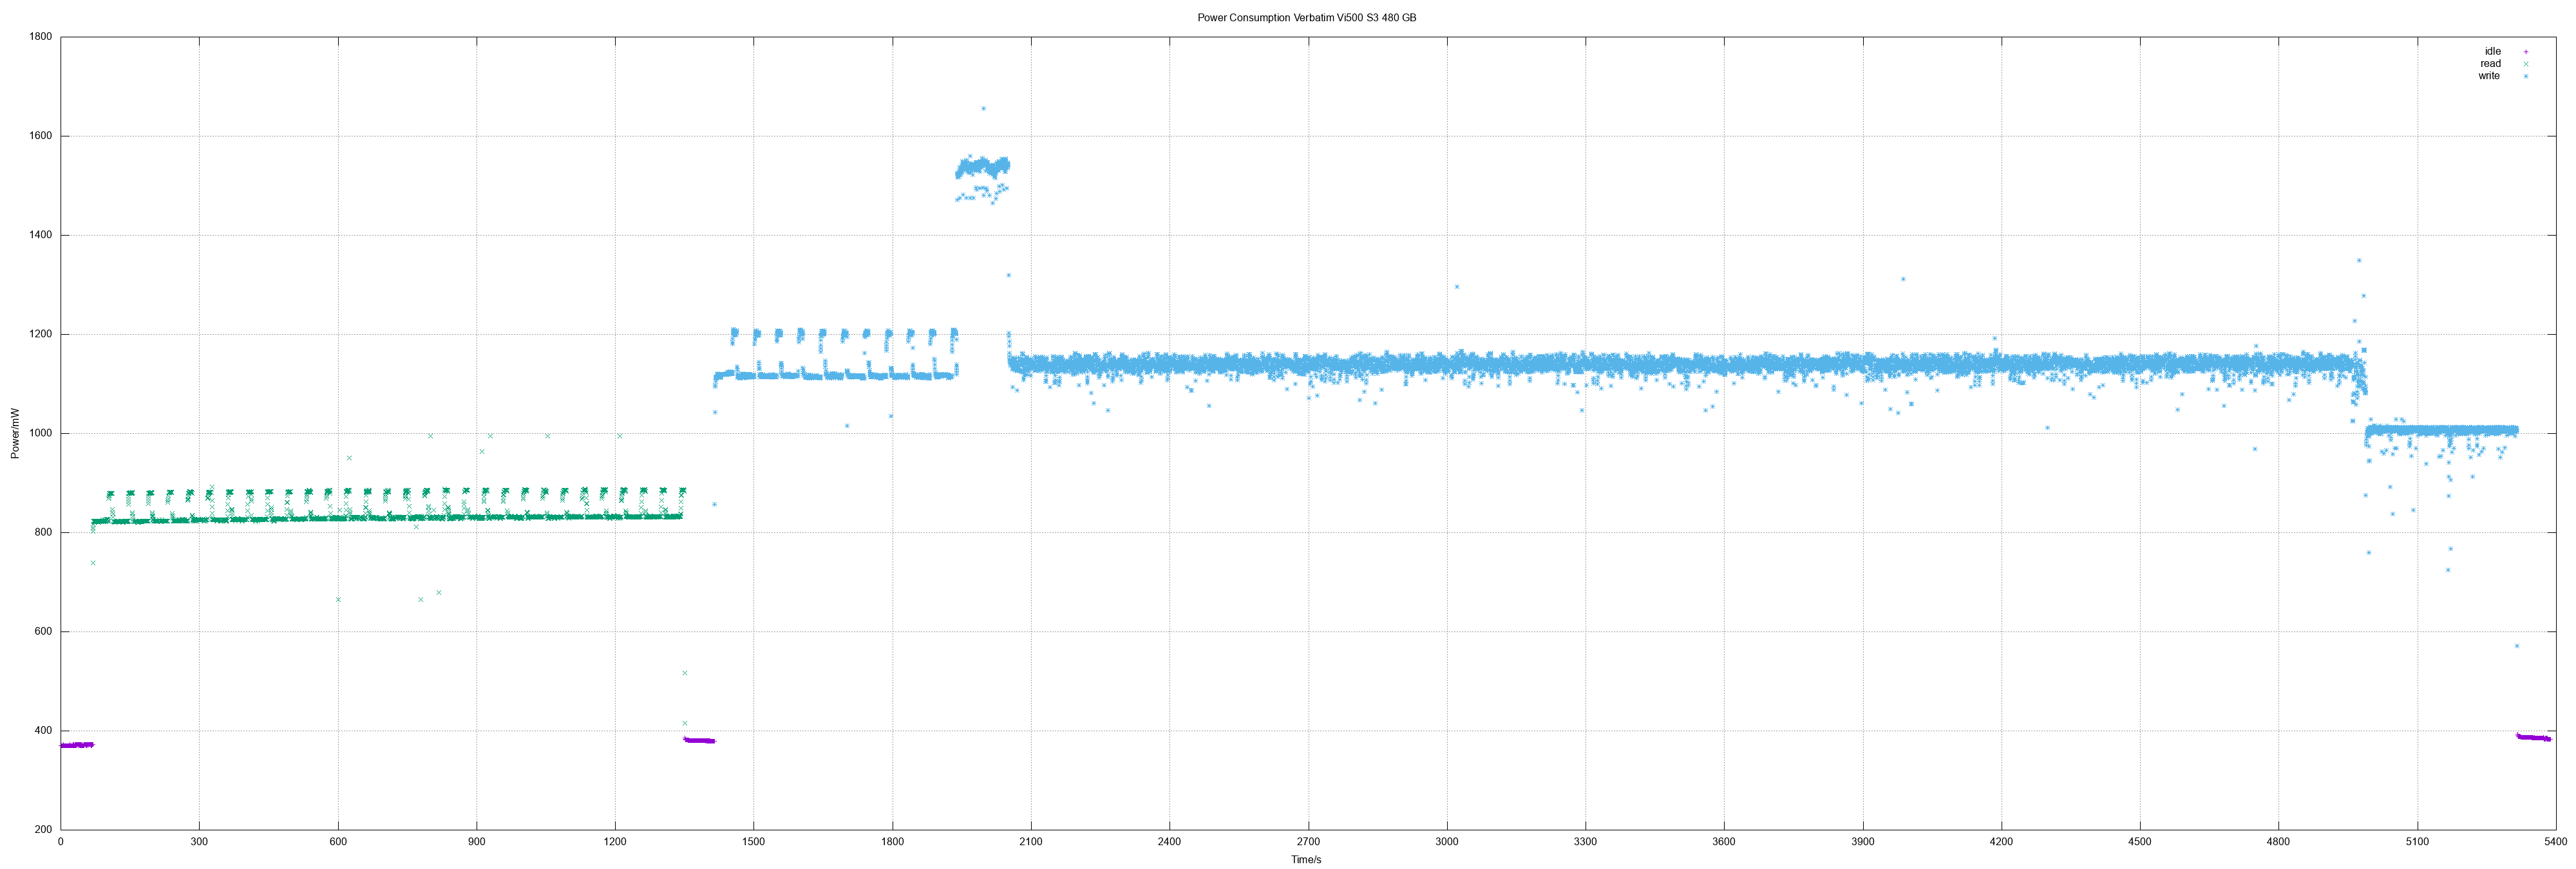
| Verbatim Vi500 S3 480 | 0.84 | 1.13 | 359 | 129 |
| WD Green 120 | 0.96 | 1.3 |
| M.2 SATA | r pow (W) |
w pow (W) |
r spd (MB/s) |
w spd (MB/s) |
|---|---|---|---|---|
| Kingston A400 480 | 0.5 | 0.5 | 372 | 329 |
| 2.5 HD | r pow (W) |
w pow (W) |
r spd (MB/s) |
w spd (MB/s) |
|---|---|---|---|---|
| Seagate ST1000LM048 | 2.7 | 2.6 | ||
| Toshiba MQ02ABD100H | 2.6 | 3.0 | ||
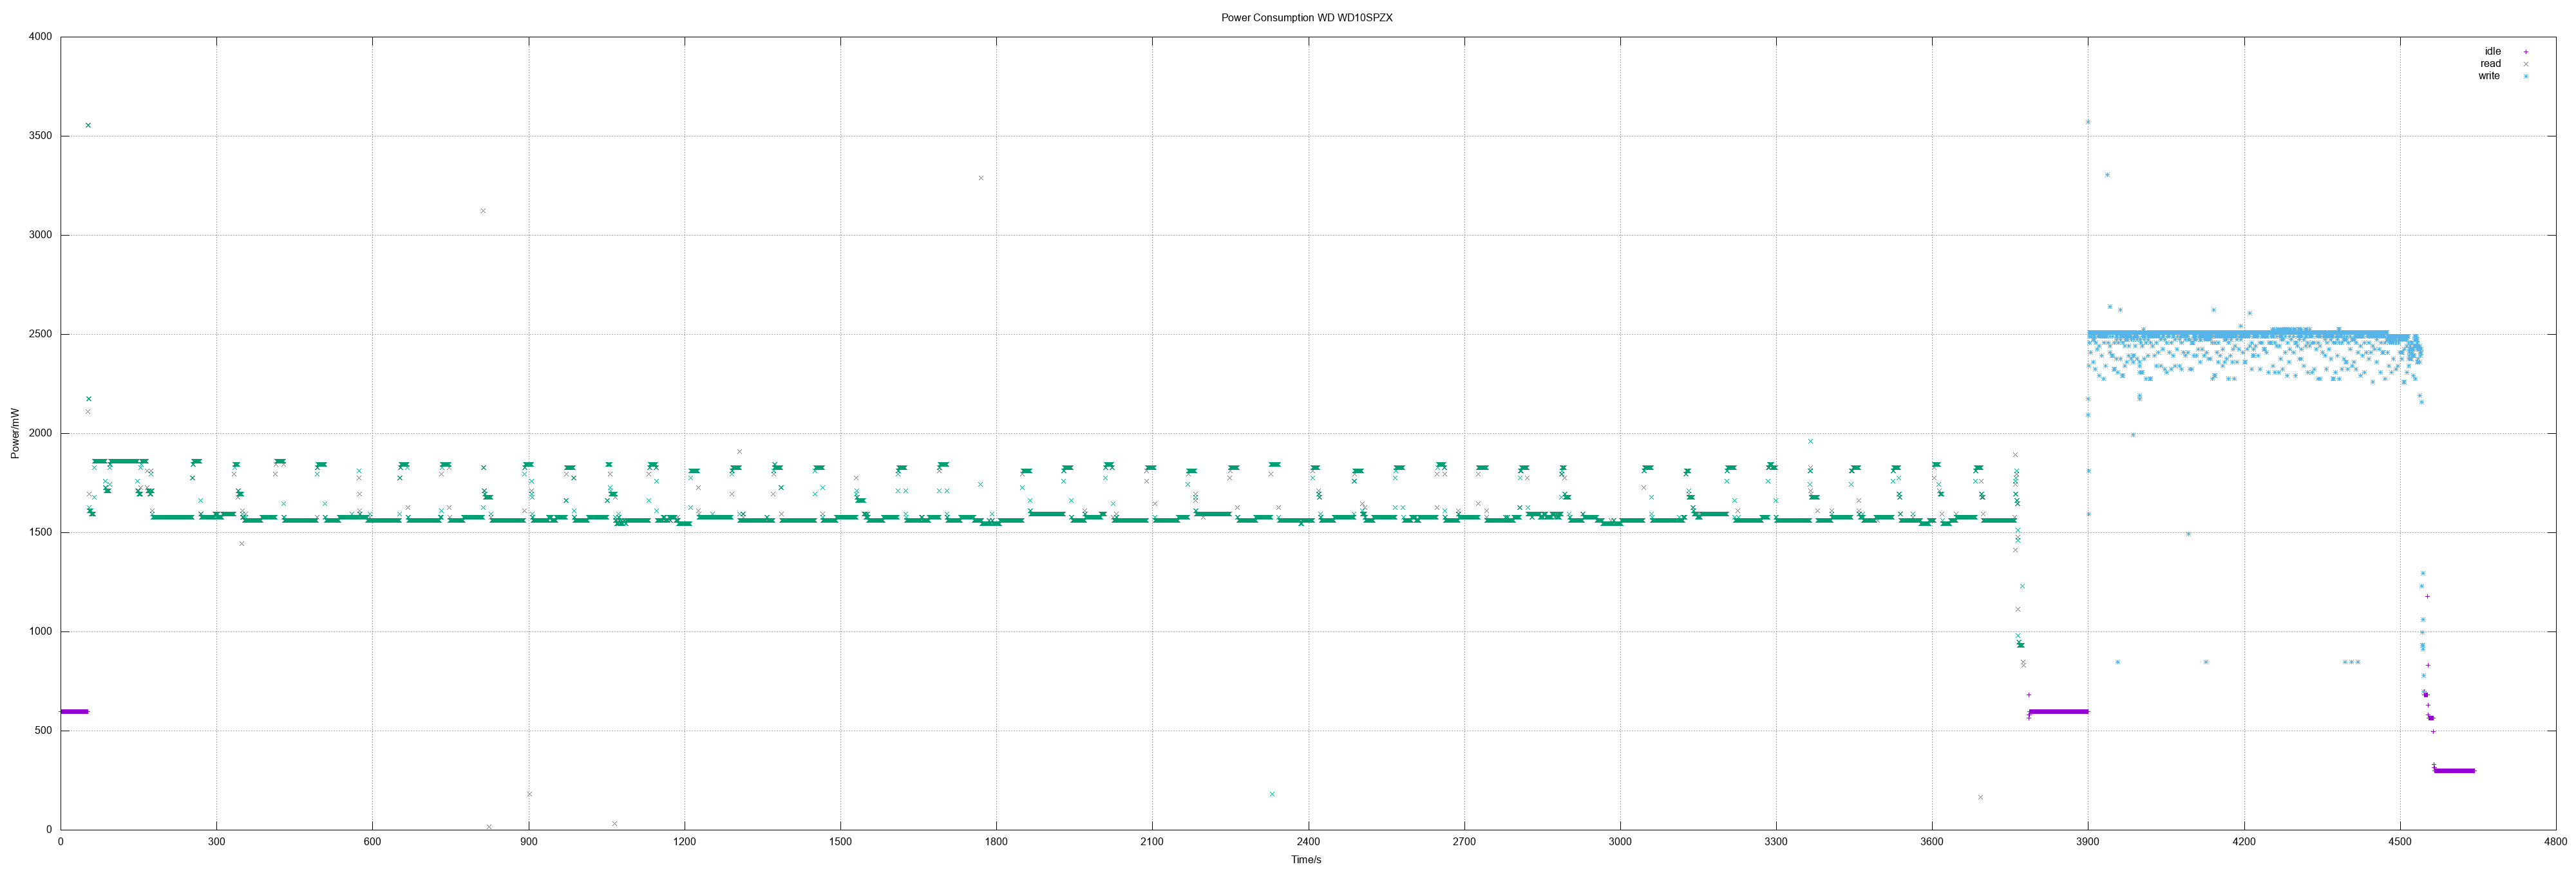
| WD WD10SPZX | 1.62 | 2.47 | 256 |
| 3.5 HD | r pow (W) |
w pow (W) |
r spd (MB/s) |
w spd (MB/s) |
|---|---|---|---|---|
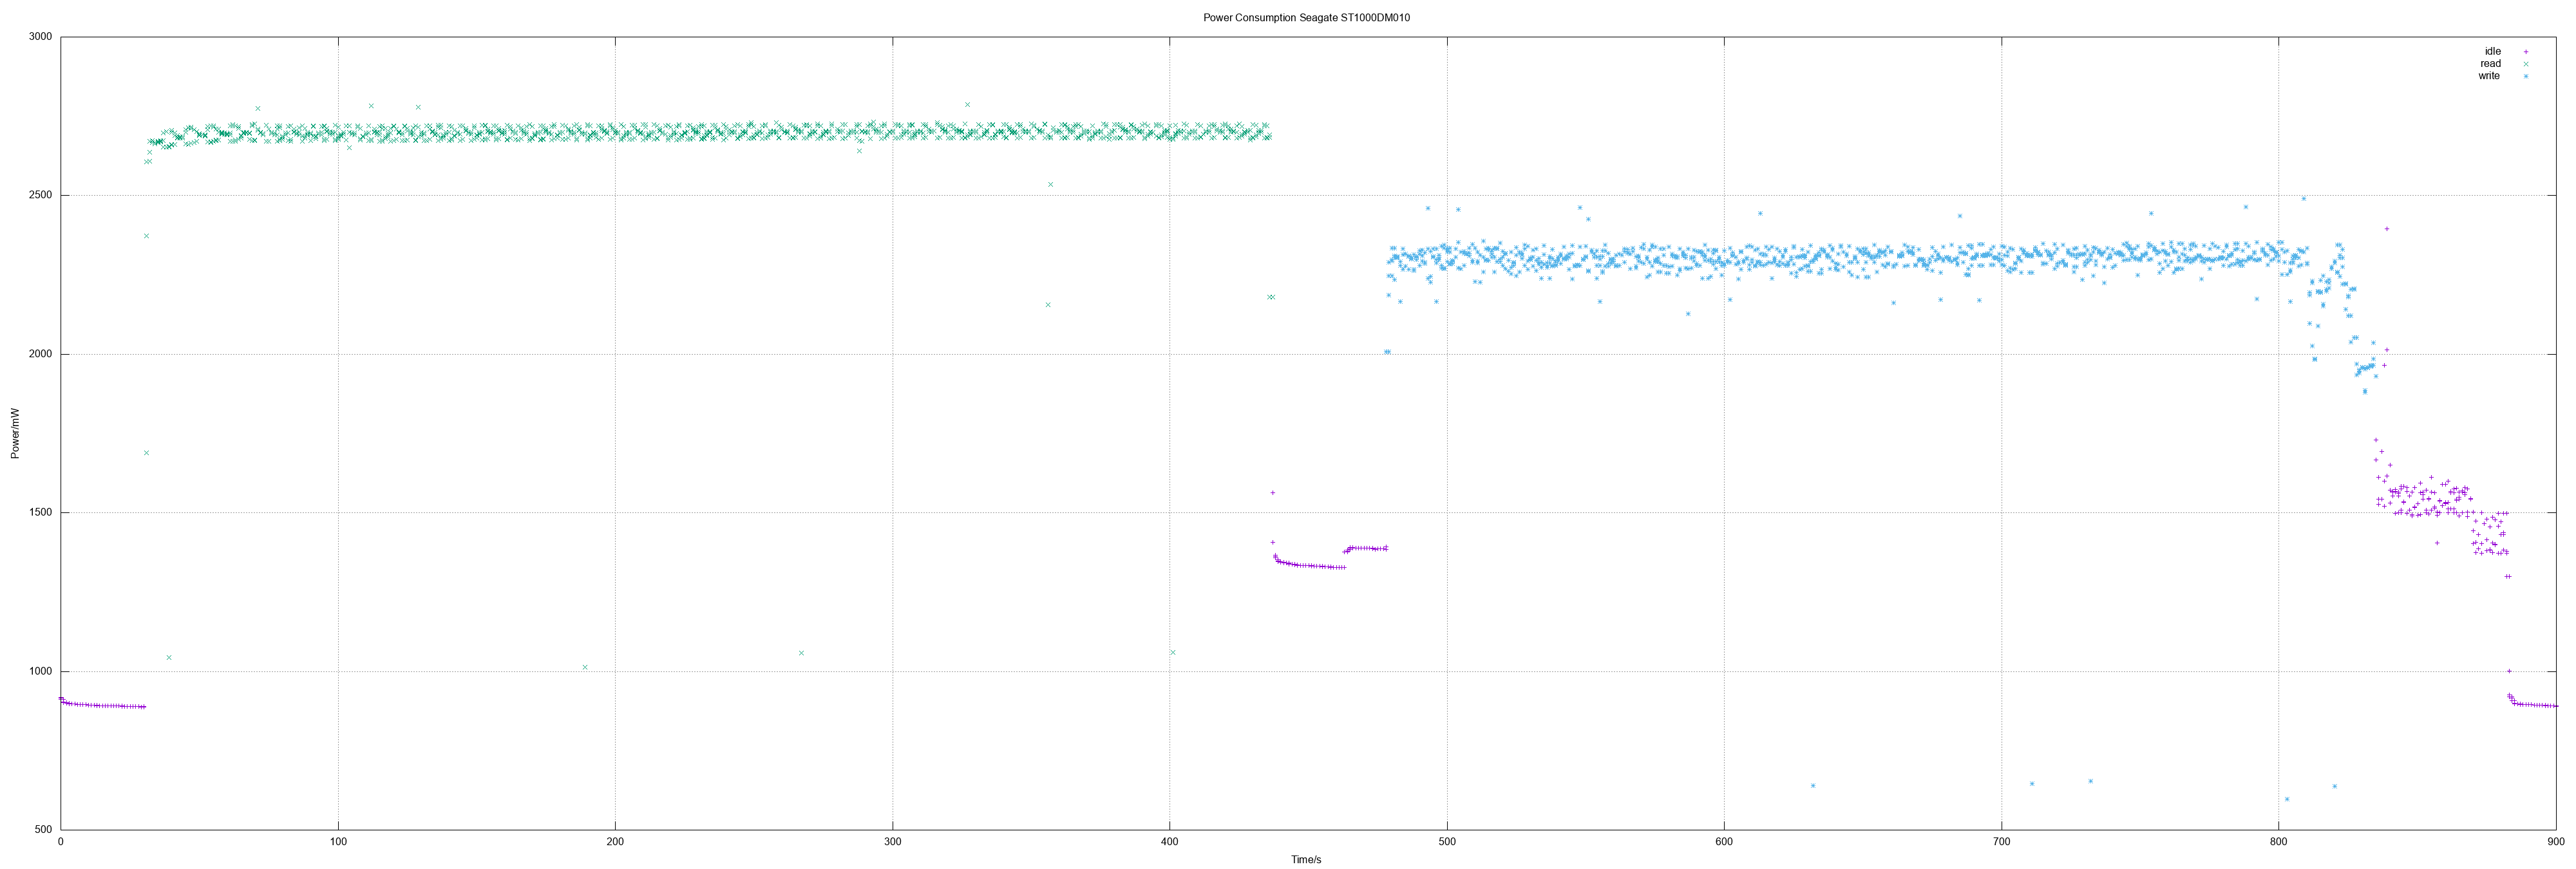
| Seagate ST1000DM010 | 2.69 | 2.29 | ||
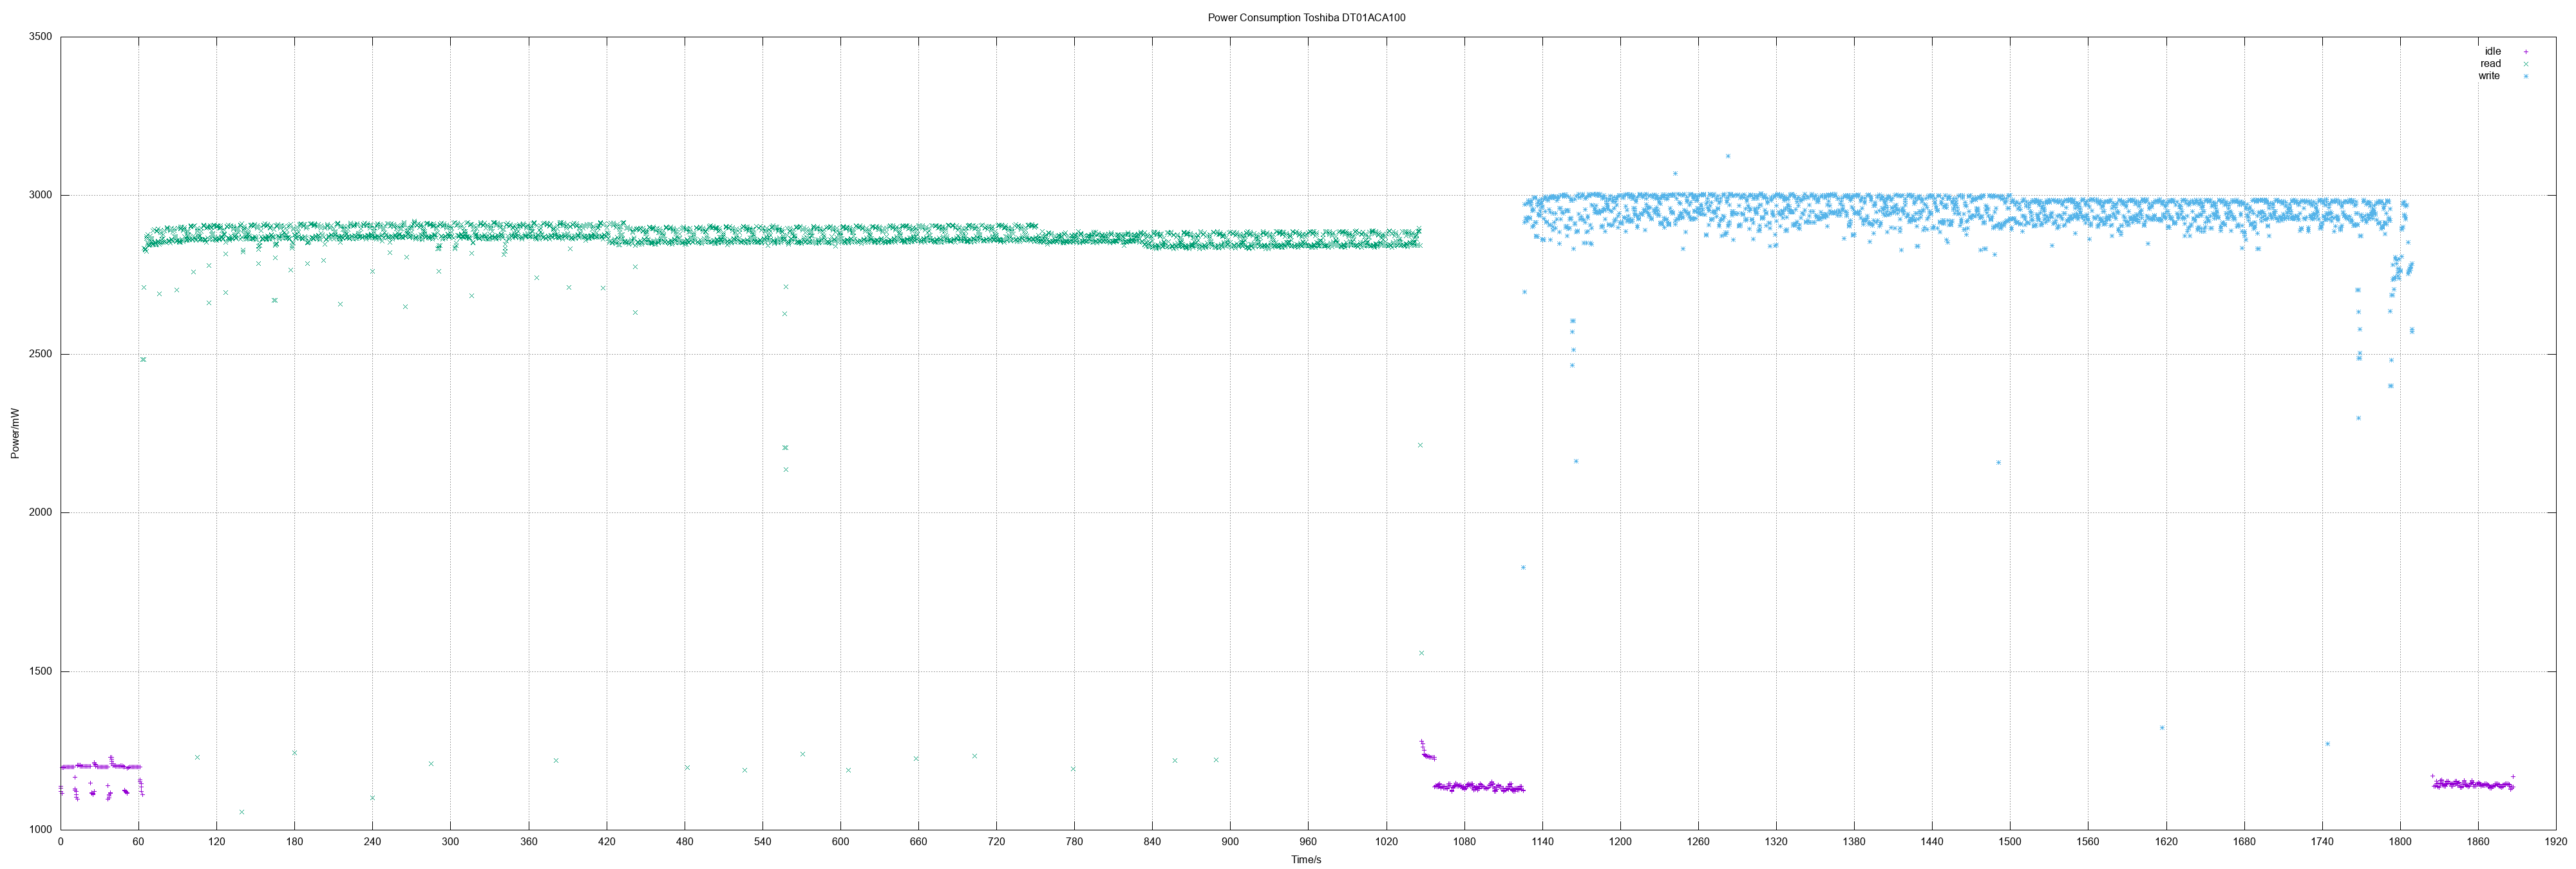
| Toshiba DT01ACA100 | 2.86 | 2.94 |
Method
Measuring environment is explained in power measuring ADATA SU800. The calculation of speed as logged in latest measurements was simply done by taking the time for reading and writing the whole SSD in relation to its size.
Other measurements
- Crucial BX500 240
- Kingston A400 480, Samsung MZ7LN128
- Patriot Burst 480, WD WD10SPZX
- Patriot Burst 240, Verbatim Vi500 S3 240/480
- Kingston A400 240 GB
- Patriot Burst 120 GB
- Seagate ST1000LM048
- Toshiba MQ02ABD100H
- Corsair Force LE200B 120 GB (2nd disk measured)
- Kingston A400 120 GB
- Corsair Force LE200B 120 GB
- WD Green PC SSD
- ADATA SU800
- Sandisk Z410